Who else is ready to get to work on some do-it-yourself projects whilst the summer sun basks down upon you?
If you’re wondering what the heck I’m talking about, let me tell you — summertime, or not winter at the very least, is the best time to get outdoors and do those projects you can’t really do inside, such as sanding down the bench in your entryway or stripping the stain and lacquer off of an old kitchen table (that you can do inside a machine shed, which we have here on the farm, but not everyone is so lucky).
I’m talking d-i-ys! (I’m a little excited!)
If you couldn’t guess, the two aforementioned projects I have already completed.
I did the table last summer, before my partner and I moved in with each other, and the bench was a recent project.
Let me just establish that stripping stain and lacquer off a table and sanding it, along with the chairs that came with it, and then re-staining it, isn’t the easiest project, but boy, was it fun. And while I plan to tell you all about the project, I’m going to save it for when I plan to go more in depth with the details. Right now, I’m looking to lay out the basics that I have learned in order to prepare you for DIY-ing.

1. Research
You know how in The Simpsons, Homer yells, “you don’t win friends with salad!” Well, in this case, win friends by watching YouTube and the HGTV channel and take in tips and tricks of how to do various projects, because the likelihood is they’ve strapped on their safety goggles a lot more than you (or me).
2. You don’t always have to start simple
I think it’s safe to say I didn’t jump into DIY-ing slowly. Nope. Rather I jumped into the deep end and needed to remember the very few things I took away from industrial arts class (think shop class) in Grade 9. If you are going to go big or go home — as with the case of the table — make sure to take your time and explore the different ways to do something to/with a project before you make a final decision.
3. Ask the experts
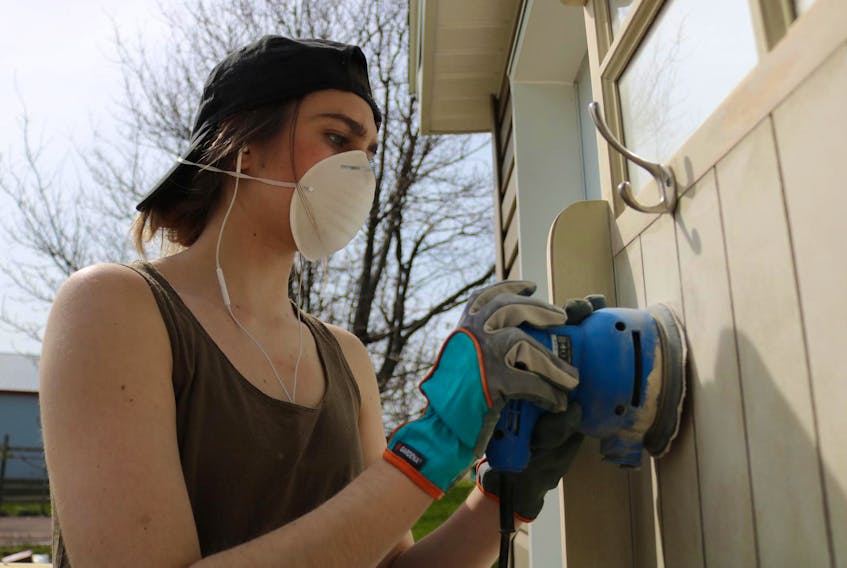
When I was working on the recent project, the bench in our porch entry, I contacted a local business that repurposes and gives new life to old furniture: The Hive Nurturing the Creative Self (or just The Hive, as I call it). I sent the owner a picture of my bench and wrote something along the lines of “Help! What do I do?” I had planned to paint the bench a new colour at the least, and Mamma Bee told me to break out the palm sander and get to work. If I still wanted to paint it afterward, she suggested a chalk paint in a grey or soft blue. (I went with grey.) The knowledge other people can share with you is the greatest resource.
4. Safety is important
I’ll say it now, and I’ll likely say it again, but safety is important, folks. I have asthma, so the dust and fumes from a woodworking project can make breathing for the next week an utter nightmare. Make sure to have a ventilation mask if you’re working with chemicals (like a paint or stain stripper) or if you’re working with flying particles (like sawdust, especially outside where it can get swept up by the wind). If you’ve got longer hair, tie it back — if it’s out of your face it won’t be a distraction and won’t get caught up in something. Safety goggles or eye protection is important — you don’t need something flying into your eye and then, all of a sudden, you’re blinded. Not to mention sawdust in the eye is very uncomfortable (I know from experience). In short, research the necessary precautions and take them.
5. Sky’s the limit
There will never be a limit to the amount of DIY projects you can do — some people have even made a business out of it. But it’s important to remember to take your time and have fun. If you’ve got a number of ideas on your brain, keep track of them in a list or through a Pinterest board (if you don’t know what Pinterest is but you want DIY inspiration, I’ve just introduced you to your new best friend). If you’re out and about and you see something like a shelf (again, personal experience here) and you think, ‘I could make that,’ why not try it? What can it hurt? OK, maybe your finger if you hit yourself with a hammer or something, but you get the point. You’ll be better off trying and learning than not bothering with it altogether.
Now friends, it’s time for me to get back to work.
Millicent McKay is a Summerside-based journalist, columnist and blogger. She’s new to this interior decorating and making a house a home gig – happy home-ing.